AspectJ for JBuilder
This is an OpenTool extension for Borland's
JBuilder IDE.
to support aspect-oriented programming
using AspectJ.
Overview
This will allow you to:
compile AspectJ and Java files within the
IDE
browse the structure of your AspectJ
program
set up a compile configuration that determine which
files will be passed to the compiler
Installation and Project Setup
Install procedure: use the installer to place the
"ajdeForJBuilder.jar" and "aspectjrt.jar" into JBuilder's lib/ext
directory. This will also install the two html files
"LICENCE-AJDEJBUILDER.html" and "README-AJDEJBUILDER.html".
Uninstall procedure: remove "ajdeForJBuilder.jar"
and "aspectjrt.jar" (and the two html files, if you like) from the
"lib/ext" directory.
Project setup: follow the normal procedure for
JBuilder project setup (for an example of this please refer to the
example below). However, note that all of the source files to be
passed to the compiler must be added to your project either as files or
within a package that is added to the project. This is necessary
because -- unlike a pure Java compiler -- ajc does not search the
SOURCEPATH for classes.

Starting and stopping AJDE: select "Start AJDE" in
the "AspectJ" section of the "Tools" menu, or just click on the "AJDE"
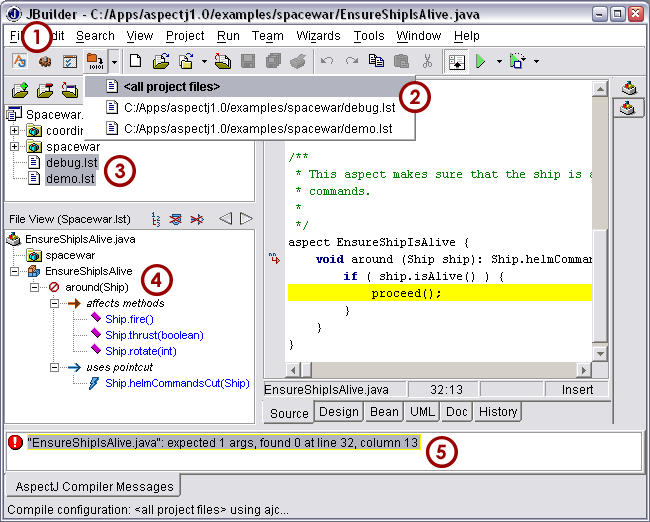
( ) button (label 1 in the first screenshot). This
will enable AJDE commands and will replace JBuilder's structure view
with the AspectJ Browser. To disable AJDE select "Stop AJDE" in the
same menu, or click the "AJDE" button again.
Compiling and Running the Project
To compile the project select "Build project with ajc" from the AspectJ
toolbar, or click <ctrl>F11 while the editor pane is active. All
of the files contained in your project and within any packages and
subpackages that have been added to your project will be compiled. You
may also select a different configuration (as with label 2 in the first
screenshot). Then, structure of the currently visited file is shown
(see label 3 in the first scrrenshot). If there is a compile error,
the clickable error message is available (as with label 4 in the first
screenshot).
To run the project select "Run Project" from the AspectJ toolbar, or
click <ctrl>F12 while the editor pane is active. Note that the
"AspectJ Runtime" library must be added to your project in order to
run. If the library is not added you will see a
"java.lang.NoClassDefFoundError: org/aspectj/lang/Signature" error.
The library is created automatically for you from the runtime
in "jbuilderdir/lib/ext". You can also create a new library
to use the runtime from a different location. If you have not added the
library to the "Required Libraries" of your project it will be added
automatically when you restart JBuilder.
JBuilder7 users please note: when you set up a run/debug configuration
you must select the "Build Target" (at the bottom of the
"Runtime Properties" dialog) to be "<None>". This will ensure
that the Java compiler is not invoked on your AspectJ sources
before running or debugging the project.
Navigating the Program Structure

Navigation of program structure is provided by the AspectJ Browser, so apart from a JBuilder
look and feel, the extra navigation AspectJ allows work as described
there. In particular, you can use views with labels 1, 2 and 4 of the
second screenshot to navigate structure using the blue links, and you
can set filtering and navigate history using the toolbar shown by label
3 of the second screenshot.
Manipulating Build Configurations
Build configurations can be manipulated adding, removing, and
editing build configuration files. The AspectJ Browser is used to select the
current build configuration. Configurations are represented by
".lst" files which are described in the documentation for the AspectJ compiler, ajc.

Adding and Removing Build Configurations
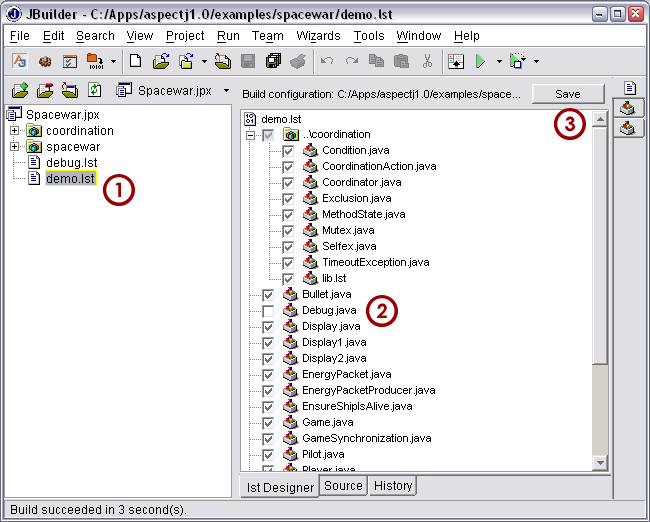
By default all of the files contained in your project and
within any packages and subpackages that have been added to
your project will be compiled. In order to compile a different
configuration first add it to the project (by selecting
"Add Files / Packages..." in the "Project"
menu, and selecting the desired build configuration file (see
label 1 in the third screenshot).
Editing Build Configurations
Double click a build configuration file in JBuilder's
"Project Pane" in order to edit it. Configurations
can be edited as either text or in the graphical designer (see
labels 2 and 3 in the third screenshot)
Example: Setting up the "Spacewar" Sample Project
(The Spacewar example is in the AspectJ examples directory.) Then
launch JBuilder
in the "File" menu select "New
project"
Select the location of the "aspectj/examples"
directory for the project. This is because the Spacewar
example uses both the "spacewar" and "coordination"
packages, so we set up the project where it can get at both
packages.
Choose a "jpr" project, either by typing in "Spacewar.jpr"
as the project name, or by typing "Spacewar" as the project
name and "jpr" as the type. Make sure "aspectj/examples"
is still the directory for the project.
click "Finish"
in the "Project" menu select "Project
properties..."
set the "Output path" entry to be the directory
where you want your classes to go
set the "Output path" entry to be the directory
where you want your classes to go
add "aspectjrt.jar" as a required library for
the project. This library is located in
"<jbuilder-install-directory>/lib/ext".
in the "Source" tab select the entry and click
"Edit" (by default JBuilder will set this directory to be
"examples/src" which does not exist)
Select the "examples" directory for the
Souce.
click "OK" to close the "Project
Properties"dialog
in the leftmost pane you will notice
"Spacewar.jpr", right click this and select "Add to
project" in the popup, then "Add class/package..." in
thenext popup. Or directly choose "Add
files/packages".
<cntrl> select the "spacewar" and
"coordination" packages and then click "OK"; this will add
the two packages to your project
click the "Build Project" button
( )
to compile the project
open the Structure View to browse the structure
of the program
click the "Run Project" button to play
Spacewar (make sure that you have set up the runtime
library as described above)
if you have not selected a class to run, you
will be prompted to do so: select the class
"spacewar.Game".
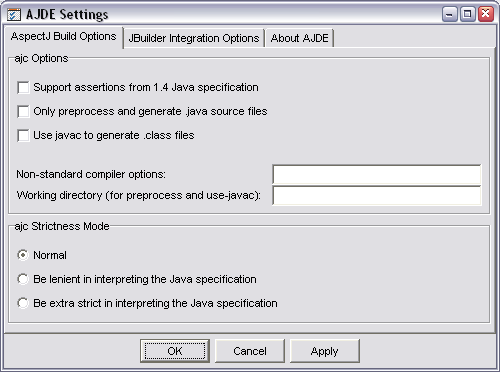
AspectJ related build options can be
manipulated in the "AJDE settings" window


 ) button (label 1 in the first screenshot). This
will enable AJDE commands and will replace JBuilder's structure view
with the AspectJ Browser. To disable AJDE select "Stop AJDE" in the
same menu, or click the "AJDE" button again.


